Legends
Elite
- Joined
- Dec 31, 2006
- Posts
- 3,235
- Location
- Twin Peaks mall, 2nd floor
- Society
- Dirty Dingos
- Avatar Name
- Inherent Marxus Legends
There has been a lot of questions about crafting recently and a lot of experienced crafters have offered tips and information. But all of this is found in various threads and could prove very difficult to find again in the future.
So I offer you here quotes and links to all of this information, all located together here in one place.
Basics of Crafting (credit to Alukat123 for putting this info together):
FAQ about Residue (credit to Darkaner):
List of Boosted Blueprints (credit to Angel O2 Mercer):
Intro to Explosive Projectiles crafting on Condition (credit to Henry BabyOxide):
Sustainable Crafting (this one I wrote):
If there's any other post you feel should be linked here because it contains a lot of very good information about crafting, please let me know.
Legends
So I offer you here quotes and links to all of this information, all located together here in one place.
Basics of Crafting (credit to Alukat123 for putting this info together):
Hey there, here's some knowledge when it comes to crafting:
figuring out the level to be maxed out on the skill side:
for SIB-BPs:
BP level lower than X: (BPlevel-1)*2.5+5 or simply recommendedlevel+5
BP level higher than X: still under investigation
level XIII BPs seem to have recommended level 57
UL BPs: When the BP is maxed out on the skill side, then it should show you 81.4% success rate in the crafting terminal, to get to 95% shown success rate it's necessary to get the QR to 100.
L BPs: as those are treated as QR 100 BPs, maxed out skill will show 95% success rate.
for non-SIB-BPs:at qr 1.0: "double what would take to max a SIB blueprint of the same rank - i.e. lvl 10 for I, lvl 15 for II, lvl 20 for III etc.
at qr 100.0: less than what a SIB blueprint takes, might be half - but not quite sure
To put it short: non-SIB blueprints can be maxed either by skill or qr but SIB blueprints take both skill and qr." (thanks Haruto)
Quantity vs. Condition:
full Quantity: highest near-success/success rate, success rate is roughly 38% in the long run, successes are at or slightly above the value if no multiplier occurs, the tt-return in runs without any multipliers can be as low as 73% for non-Sib and 78% for SIB crafts (based on maxed skill & QR).
full Condition: high failure rate, success rate is roughly 5% in the long run, seperated build-in multiplier, successes give about 8 times the value of the click-costs if no multipliers occur, near successes are boosted by this multiplier as well
Every other positions on the slider are somewhere between those 2 things.
Fails, near success, success & multipliers
Fail: no loot at all
near success: ~25%, ~50%, ~90% return of the click-costs (before condition multiplier), return can happen in getting raw materials back or residue
success: ~100-110% return of the click costs (without any multipliers), multipliers can happen (i.e. times 100 on a 0,5 PED crafting resulting in a 50+ PED global), it is possible to loot BPs, it's possible to loot a UL & a L BP on the same success. It is possible to loot Gems, like Garnet, Opal and so on, if the global/hof is big enough and you get lucky.
Residue:
L items are usually filled by using residue when crafting, the residue is determined by ressources used in crafts:
ore/ingot: metal residue
enmatter: energy matter residue
animal oils: animal oil residue
robot parts: robot component residue
leather & hides & wools : tailoring remnants
components: metal residue & energy matter residue
Looting BPs:
the range of lootables BPs compared to BP being used: -2 to +3 level and based on the BP being wanted: -3 to +2 level.
examples:
If you craft with a level 2 BP, then you can loot level 1-5 BPs
If you craft with a level 5 BP, then you can loot level 3-8 BPs
If you want to loot EP I, which is a level 1 BP, then you need to grind on a level 1-3 BP
If you want to loot EP IV, which is a level 7 BP, then you need to grind on a level 4-9 BP
and so on.
BP being used/wanted:
the BP loots are tied in the following categories:
Mechanical, electronical, metal BPs do drop/loot from mechanical, electronical, metal BPs (they are same loot-pool)
Weapons are same loot-pool, i.e. laser crafts can drop fist, sword BP and so on and vice versa
tool, furniture, enhancer, tailoring, vehicle, armor, attachment, material have each their own loot-category, i.e. vehicle crafts drop only vehicle BPs, tool crafts do only drop tool BPs
planet-specific BPs:
Some blueprints, like the ones from PP, can only be looted when crafting on that specific planet.
I.e:
- Hotfoot BPs are Arkadia BPs and can only be looted while crafting on Arkadia.
- Hoverboard BPs are Rocktropia BPs and can only be looted while crafting on Rocktropia.
- Pitbull BPs appear to be caly BPs and only be looted while crafting on caly.
"Boosted" BPs
some BPs in the game have a build-in multiplier in addition to the potential condition-multiplier and multipliers which may occur on success.
Those build-in multipliers vary from BP to BP. near successes benefit from the build-in multiplier as well.
examples:
a times 2 boosted BP that costs 10 PED per click, will give 20-22 PED per success without any other multipliers.
a times 2 boosted BP that costs 10 PED per click, can produce a ~160000 PED hof on a success when crafting on full condition and getting times 1000 multiplier (10*2*8*1000), note: crafting on full condition is always quite some gamble and times 1000 multipliers are the rarest, so better be sure you can afford to lose a lot of peds before starting such gamble. As you may lose it all due to high failure rate.
FAQ about Residue (credit to Darkaner):
PS: understand that Darkaner wrote this back in 2007 and with the new crafting machine, it is much more user friendly and straight-forward now. But back then, you used to have to add all individual ingredients manually into a window very much like the tiering of items currently works. It was tedious and knowing which residue to use for individual BPs before buying them was not that simple actually. However I've decided to include his post here because much of this information is still pertinent and is useful to know.I have noticed there's a lot of confusion about residue, even among the more experienced players, so here's a little FAQ. Let me know if I've missed something.
Here we go:
What is residue?
Residue is something you get mainly when crafting and hunting. When crafting, the residue pops up in the loot window on successful or near successful attempts. Depending on what raw materials (ores, enmatters, animal oils, robot components and/or tailoring materials) you were using you get different kinds of residue. Residue also drops for hunters and (on rare occasions) miners.
The following table shows how it works:
(Type of residue: Comes from)
Metal residue: Crafting with ores, crafting furniture that only use wood components.
Energy residue: Crafting with enmatters
Animal oil residue: Crafting with animal oils, Hunting (most mobs drop oil residue)
Robot residue: Crafting with robot components, Hunting (robots), Mining (robot spacecrafts), Robot Beacon missions
Tailoring remnants: Crafting and tailoring with wool, hide etc
What is it used for?
Residue is used for increasing the tt value of crafted items, and is only useful when crafting limited (L) items. You can use it when crafting non-limited items as well, but it is pointless to do so since you can get these items to max tt in the repair terminal. You can not use residue when crafting stackables (basic filters, standard dampers etc). The tt of the crafted item will be raised with the exact tt value of the residue added.
Why do I use it?
Limited items can not be repaired, so it is important to craft them at as high tt value as possible. It is a way for crafters to get more profit (or limit their losses) since they sell the items for a certain percentage. 5% of 100 peds is more than 5% of 10 peds.
How do I use it?
Simply drag it into the crafting machine together with the ingredients. You can use several different types of residue at the same time, and if you put too much in you will get the remaining residue in return (so don't worry about that). But be careful with using multiple types of residue, since metal residue seems to be used first until it's all gone.
When deciding what residue to use for your limited item you need to look at:
1. Blueprint ingredients. Look at the table above. If the blueprint needs ores, you can use metal residue. If it needs enmatters, you can use energy residue. If it needs animal oils, you can use animal oil residue etc.
2. Residue price. Always use the cheapest residue possible. If metal residue costs 120% and you can use animal oil residue which your friends will give you for tt, you should of course use animal oil residue.
Example: You have a Breer M4a (L) BP. This blueprint needs:
Binary energy (enmatter)
Kanerium (ore)
Animal Pancreas gland oil
Animal Thyroid gland oil
Electropositive Modulator
This means that you can use metal, energy and animal oil residue (we can forget about the Electropositive modulator as it is a crafted component). The clever crafter would then use animal oil residue as it is the cheapest one. The Breers maxed tt value is 175.6 and will probably use around 150 peds of residue, but to be on the safe side you should put at least 175 peds in there as you will get the remaining residue back anyway.
Residue prices
Today, metal residue is the most expensive one, then energy, then oil and robot. Oil and robot residue comes from hunting so finding them for tt is very easy. Tailoring remnants are pretty much useless (I think you can use them for crafting whips, limited armor and other bp's that need tailoring materials, but I'm not sure). Metal residue is expensive because of some popular blueprints that only uses ores as ingredients, for example the ore amps.
Do I get more globals/hofs when I use residue?
No. And residue used will not be counted towards the value of any global/hof
How do tailoring remnants work?
Tailoring remenants do not work with hides or wool, only refined tailoring materials. So if the blueprint needs hides/wool, remnants wont help you get higher tt. But if the blueprint needs refined materials (wool thread, cloth etc) it will. (thanks Mandy).


List of Boosted Blueprints (credit to Angel O2 Mercer):
I would like to collect a list of confirmed boosted BPs (limited, golden name, "Boosted" marker showing).
Finder Amplifiers
- Level 1 Finder Amplifier (L) Blueprint (L)
- Level 2 Finder Amplifier Light (L) Blueprint (L)
- Level 3 Finder Amplifier (L) Blueprint (L)
- Level 4 Finder Amplifier (L) Blueprint (L)
- Level 6 Finder Amplifier (L) Blueprint (L)
- Level 7 Finder Amplifier (L) Blueprint (L)
- Level 8 Finder Amplifier (L) Blueprint (L)
- Level 9 Finder Amplifier (L) Blueprint (L)
- Level 11 Finder Amplifier (L) Blueprint (L)
- Terra Amp 3 (L) Blueprint (L)
Weapons
- GeoTrek H15 Vile (L) Blueprint (L)
- GeoTrek H23 Crista (L) Blueprint (L)
- GeoTrek H24 Sin (L) Blueprint (L)
- GeoTrek AL15 Taurus (L) Blueprint (L)
- GeoTrek AL22 Lupus (L) Blueprint (L)
- GeoTrek LP175 Sphyra (L) Blueprint (L)
- Karma Killer (L) Blueprint (L)
- Jester D-5 (L) Blueprint (L)
- True Faith (L) Blueprint (L)
- Breer M4a (L) Blueprint (L)
- DetPil V-Rex 2000 (L) Blueprint (L)
- Eraktor Es 10 (L) Blueprint (L)
- Eraktor Ekk 100 (L) Blueprint (L)
- Cochran LP5 (L) Blueprint (L)
- Marcato-9 503:3509 Blueprint (L) (name bugged?)
- Starkhov LPR-17 (L) Blueprint (L)
- Starkhov LPR-30 (L) Blueprint (L)
Weapon Amplifiers
- Hotfoot 10 (L) Blueprint (L)
Tools
- Ziplex Z10 Seeker (L) Blueprint (L)
- Vehicle RK-20 (L) Blueprint (L)
- UR125 (L) Blueprint (L)
- Vivo Neo, Adapted (L) Blueprint (L)
- GYRO Combat FAP-14 (L) Blueprint (L)
- Ziplex Z15 Seeker (L) Blueprint (L)
Vehicles (and related)
- Warp Drive 1 (L) Blueprint (L)
- Pitbull Mk. 3 (C,L) Blueprint (L)
Armors (and related)
- Infiltrator Harness (L) Blueprint (L)
- Infiltrator Gloves (L) Blueprint (L)
- Infiltrator Arms (L) Blueprint (L)
- Infiltrator Foot (L) Blueprint (L)
- eMINE PG/HG (L) Blueprint (L)
- eMINE PG/T (L) Blueprint (L)
- Luna Helmet (L) Blueprint (L)
- Luna Arms (L) Blueprint (L)
- Luna Thighs (L) Blueprint (L)
- Predator Helmet (L) Blueprint (L)
- Predator Harness (L) Blueprint (L)
- Predator Arms (L) Blueprint (L)
- Predator Shins (L) Blueprint (L)
- Solir Gloves (L) Blueprint (L)
- Solir Thighs (L) Blueprint (L)
- Serum Helmet (L) Blueprint (L)
- Serum Harness (L) Blueprint (L)
- Orca Helmet (L) Blueprint (L)
- Orca Harness (L) Blueprint (L)
- Orca Arms (L) Blueprint (L)
- Orca Gloves (L) Blueprint (L)
- Orca Thighs (L) Blueprint (L)
- Orca Shins (L) Blueprint (L)
- Orca Foot (L) Blueprint (L)
- Armor Plating Mk. 3E (L) Blueprint (L)
- Renegade Foot Guards Blueprint (L)
- JOPLIN Dragon plate mk1 (L) Blueprint (L)
- ELVIS Dragon plate mk3 (L) Blueprint (L)
- RUDOLF Dragon plate mk3 (L) Blueprint (L)
- Spam Helmet (L) Blueprint (L)
- Spam Arms (L) Blueprint (L)
- Spam Harness (L) Blueprint (L)
- Spam Thighs (L) Blueprint (L)
- Spam Shins (L) Blueprint (L)
- Malware Harness (L) Blueprint (L)
- Malware Thighs (L) Blueprint (L)
Decoration/Furniture
- Short Tied Katu Curtain (C) Blueprint (L)
- Medium Polka Valance (C) Blueprint (L)
- Towel Blueprint (L) Blueprint (L)
- Short Katu Curtain (C) Blueprint (L)
- Short Tied Katu Curtain (C) Blueprint (L)
- Short Royal Katu Curtain Blueprint (L)
Clothes
- Pilot Goggles Blueprint (L)
Need confirmation
- Medium Polka Valance (C) Blueprint (L)
- Willard Heatray A (L) Blueprint (L)
- Willard Heatray B (L) Blueprint (L)
- Aldimon Bed Blueprint (L)
- Classic Winston Pub Stool Blueprint (L)
- Classic Winston Round Table Blueprint (L)
- Traditional Winston Long Table Blueprint (L)
- Long Polka Curtain (C) Blueprint (L)
Might need a bit of help with this")
Intro to Explosive Projectiles crafting on Condition (credit to Henry BabyOxide):
EP 1: 00.02 per click
Ep 2: 00.20 per click
EP 3: 02.00 per click
EP 4: 20.00 per click
uses nanocubes, apart from the blueprint, no further markup (cheapest)
- gives explosives as a result
+ residue
& maybe BPs
& maybe GEMS, Garnet, Opal, Emerald, Ruby, Diamond
4 types of 4 levels
tech , explosives, and tools, and one more i think
Recycles 1: 050 PED per click
Recycles 2: 100 PED per click
Recycles 3: 150 PED per click
Recycles 4: 200 PED per click
uses acquired materials,
gizmos , explosives, and animal oils, or basic metals or enMatters
BPs are limited and both mats and BP has markup (very expensive)
- gives shrapnel as a result (convertible to universal ammo)
+ residue
& maybe BPs
& maybe GEMS, Garnet, Opal, Emerald, Ruby, Diamond
*BPs are expensive because of rarity, greedy people wanting to profit, and the idea that one hit could land you potentially a billionaire.. (not) ,
9900x seems to still apply yet no one has beaten it yet
imagine 9900x * 200 ped cost
all calculations are based on base TT value, markups are considered lost.
potential possible HOF base on simple formula is:
Cost of Base Mats * Condition Bar * random multiplier = potential HOF
Condition Bar works like a percentage, with an average of 95% to 105% success return on full qty
Imagine the Condition bar like a slider between 1% to 100 % of a theoretical max possible multiplier of 9900
i forgot where i got the 9900, from think it was was some auction fee calculation, however, so far nothing went over the 9900 multiplier
on full qty of almost any craft, the success average is around 1x the base cost
on full condition of almost any craft, the success average is around 5x to 10x the base cost
-----------------------------
start of unproven theory
-----------------------------
i theorized that, during a fail, it is possible that the pre-roll before the near-success determines if you get a fail or a pass,
if fail, it fails, but if pass, it proceeds to near success re-roll,
on near success, its always below a certain average value, otherwise it would have been a success,
which leads me to theorize that, a random generator applies a value to the crafting,
if the value falls below a threshold, its a near success, if it passes a threshold, it becomes a success,
when it passes a success, a third random generator applies the multiplier,
-----------------------------
end of unproven theory
-----------------------------
e.g:
qty ep4 gives around 20 ped +-
condition ep4 gives around 160 ped +-, lowest is 140 ped+- , highest average is 190 ped +-
anything beyond is where the "rare" multiplier kicks in
this rare multiplier is up to 9900
but on full qty the theoretical max is about 10 % of 9900 = 990 * 20 = 19,800 ped
on full condition the theoretical max is about 100% of 9900 = 198,000 ped
skill is gain when success or near success, skill value amount gained is proportionally diminishing
as your skill gets higher, you get lesser,
bonus skill proc is random,
skill gain is random i think, or probably based on a number of fails,
if you use a lvl 100 gun at low skill and low level, and when you make a successful hit with a successful skill increase, your skill gains appears to be higher then normal, (but i call this normal) , skill gain values diminishes as your skill levels increases,
with SIB, during SIB period, your skills gain values are double, but after you maxed, your skill gain values drops lower than if you had use a lvl 100 gun,
i assume the effect is similar in construction, if your not maxed on the BPs, you get more skills, but once you maxed, your skill gain values drops,
overall you will see a constant diminishing effect, that is because you get more and more skills, it is proportional to what you have already achieved,
the only way to see that you get more skills value, is if you sold your skills,
you can boost the value gained by using pills,
max condition also gives you more of the final product, when you are successful, but this applies only to material based or stack-able products, not single item or equip-able items, those you only ever get 1,
it is also assumed that whatever you get during a condition is also proportionally increased accordingly,
eg:
- more clicks on found BPs
- more of gems
- more of resulting stacks
Sustainable Crafting (this one I wrote):
I'll take a crack at this, though there are definitely more experienced crafters, I think my process is workable and could be a good start for anyone wanting to get serious about crafting in EU.
So first a few 'truths' to get us oriented. I've said some of these things elsewhere and I stand by them no matter what anyone else says:
Axiom #1: The only thing that has ever proven viable with crafting in Entropia in the long-term is Quantity crafting
Axiom #2: If it doesn't give you something that you can sell to another player for markup, don't craft it
Ok so now that we have these first 2 axioms as a starting point for our crafting career, we will ignore any other strategies that don't align with the above.
1. PED Turnover/Cycling (aka volume crafting):
One of the biggest challenges for crafters is that it is incredibly easy to make items, but often times, not so easy to get rid of them (sell them). So before I start, I often look at what the sales volumes are in the past week. The Market History for individual items will be your friend for that. Here's an example using items that all have the same TT value, Widgets:
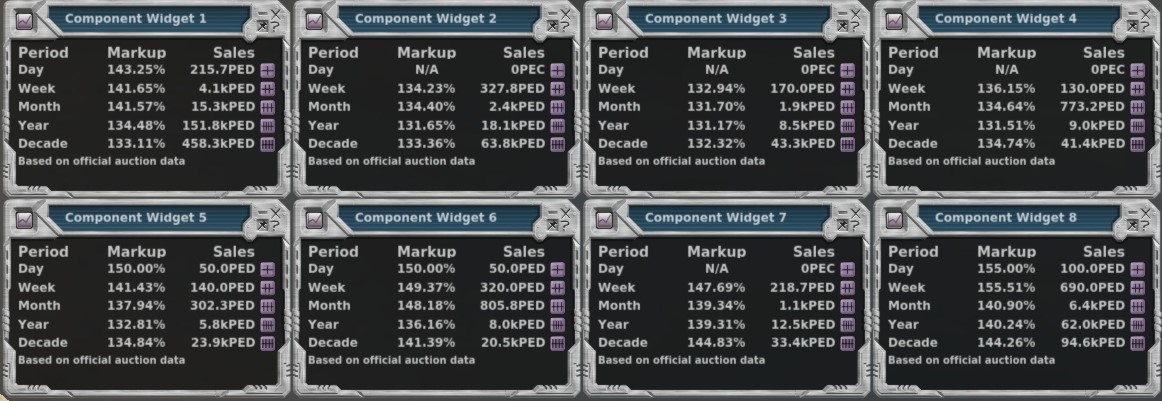
Now, having these all side-by-side like this, it's easy to see which ones sell more, and which ones don't sell much. When you look at the history for Widget 1, you can see that in the last week, 4k PED of them have actually sold on auction, this is significantly more than for all the other Widgets. If I was going to get into the Widget crafting business, I would probably just focus on the Widget 1 and ignore the rest.
Here's another example, albeit a bit more complicated because in this one, the TT values are different:
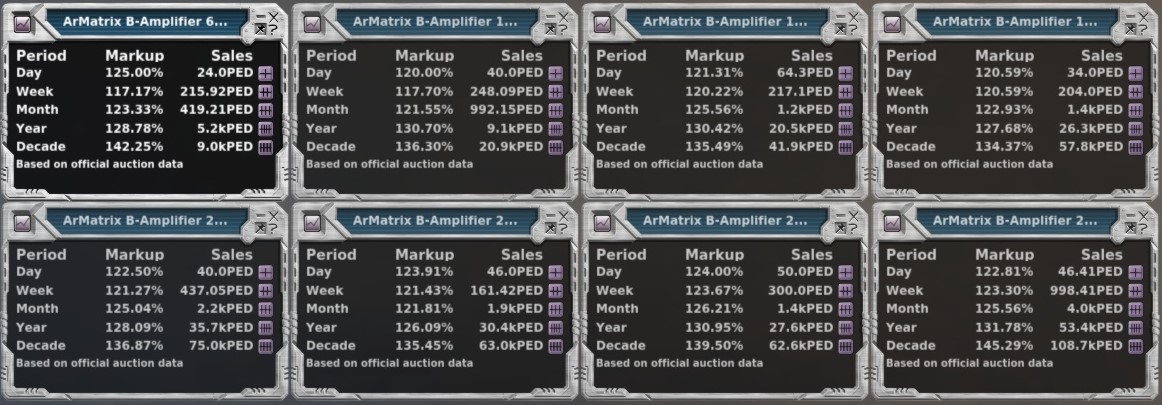
The numbers in the 'Sales' column is the total TT amount and doesn't take into account the markup amount. So the TT is the only thing we care about for the math we need to do. Now, the amps shown here are the 6P, 10P, 13P, 17P, 20P, 23P, 25P and 28P, in that order. Which one has had the most volume in the last week? You'll have to go figure out what the TT is for each one and divide the week 'Sales' amount by the TT for 1 of them to arrive at that number. Believe it or not, I have done this before for all amps. It's a good exercise to do, it will reveal a lot about volumes of sales for items and this will help prevent too many failed auctions.
Typically, if something has no sales in the last week, I ignore it and don't craft it, because the risk is too high that I will have failed auctions (the max auction duration at this time is 7 days).
2. Reverse Engineer your crafting career, think long-term:
There is a tremendous amount I could say about this, I could spend 3 hours or more just on this one tip, but I don't have time today so I'll have to just give you some pointers and leave it for you to mull over on your own.
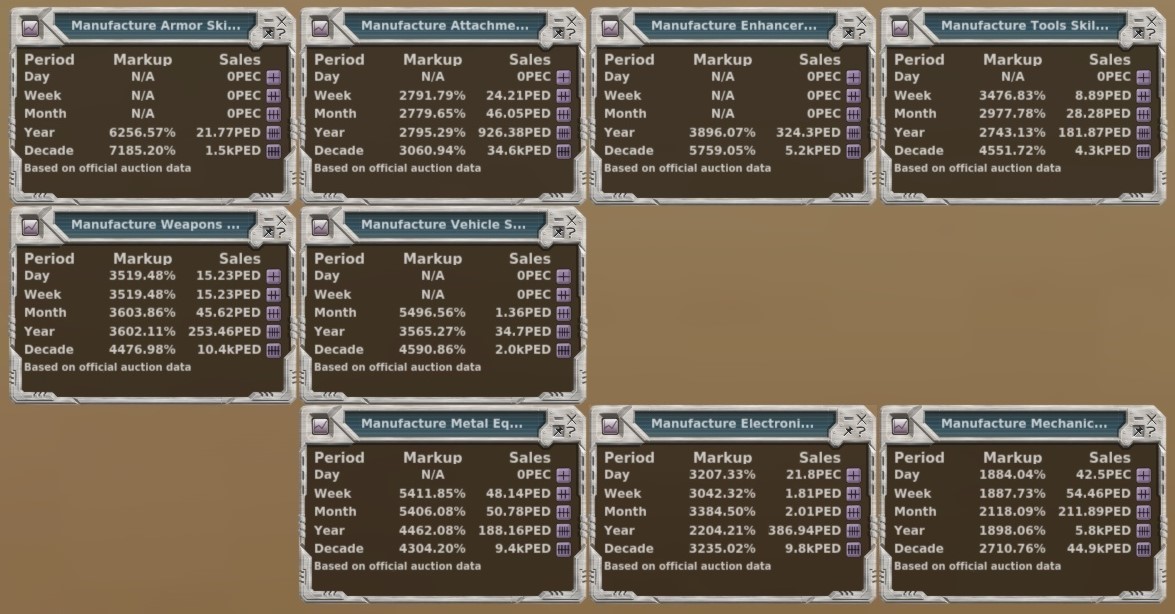
a) Skills don't have the same value. Look over the value of each 'Manufacture' skill and consider which skill you might prefer to work on. In the end, these have value and if you ever get into trouble during your crafting career, you might want to sell some of these skills in order to make yourself solvent again so you can keep going. But if you are working on skills that don't have much value, it might be hard to convert some of these skills back to PED again, so think about that:
b) Think about your long-term plans; do you plan to buy a shop eventually? What would you sell? What's the competition like? What are the margins like? The more competition there is on something, the tighter the margins are. For example the margins on ArMatrix guns are getting very tight these days and there are already a few shops that sell ArMatrix guns cheaper than auction. That would be a tough market to get into. Same goes for Damage Enhancers, and with those I would say it's even worse because the BPs are UL, so those that have BPs with QR 100 are at a huge advantage and there's just no way to enter this market while keeping your crafting returns in the green initially, you will have to invest a certain amount to get started (either by buying QR 100 prints, or by getting your own up to QR 100).
There doesn't seem to be as many Furniture or Tool shops, but these are also low-volume items, which will greatly affect your turnover/cycling capability. All these things must be considered long-term. Do you want to have volume? Do you want to have exclusivity? These 2 things are usually diametrically opposed and cannot be achieved together, you have to chose one or the other.
Another thing that should enter into your long-term planning process is the amount of PED you will be able to dedicate to this. Armors and Mining Amps for example take huge amounts of PED to do successfully. If you don't think you'll have at least 20k PED to dedicate towards your crafting endeavors, you might not want to get into certain markets
So think about where you want to be in the long-term, then knowing that, you can figure out what you will need to do in order to get there. That is how I got to where I am now.
3. Start at the beginning: Components
Almost anything you might want to craft eventually will require some sort of components. Weapons, Armors/plates, Amps, etc... These all require some sort of Component in order to make them. So it makes sense that you might be better off starting with raising your Manufacture Component skills at the start as these skills will be useful to you in the future, even if you don't plan on becoming a Component crafter long-term.
As seen in the previous image above, out of the 3 component crafting skills, Manufacture Metal Component is the most valuable and sought-after, and with good reason. Many of the higher-level Metal Component blueprints are expensive to max out. There are a lot of Metal Components which are needed for many Armor plate, ArMatrix weapon and ArMatrix Amps and so the volumes that you see on things like Basic Sheet Metal reflect that. I personally go through thousands and thousands of Basic Sheet Metal in a matter of minutes when I'm making armor plates for my shops, so it's a pretty reliable thing for anyone to craft, it has volume and it has decent mark-up.
If you were going to take that advice and start making Metal Components, here are the current volumes for all of the Level 1 and Level 2 BPs:
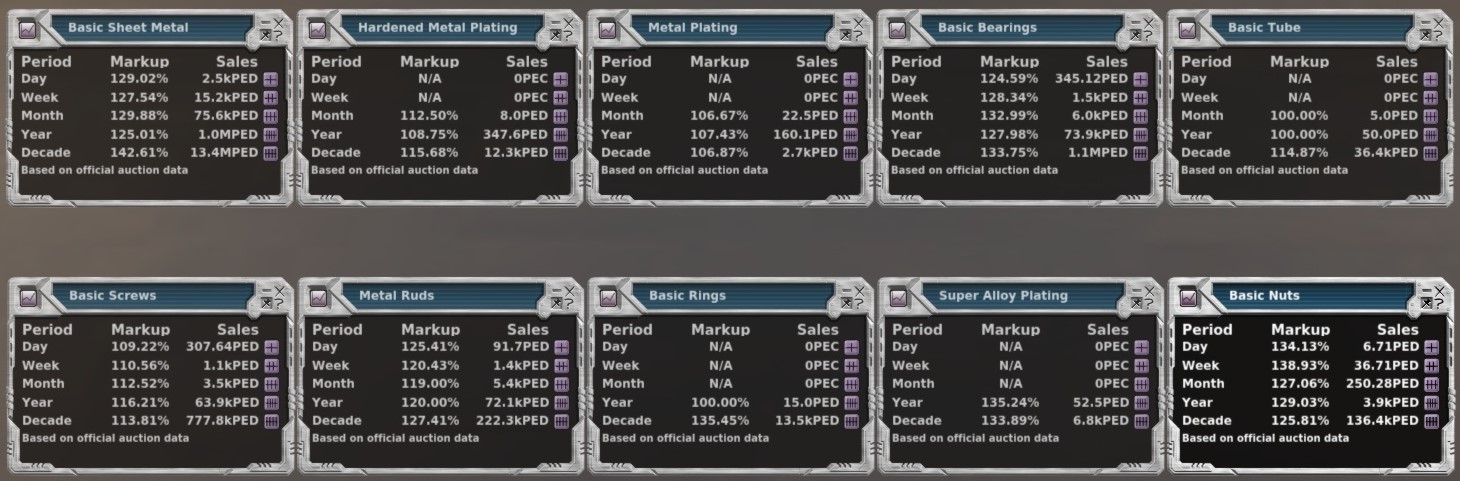
Some pointers here:
a) If there are no sales in the last week, leave it alone
b) At first, Volume is more important than MU
c) The skills you get will be a function of the cost/click; the higher the cost to click, the more skills you get
You can ignore c) above when you are just starting out, but eventually you will be looking at this more closely in order to achieve certain milestones. Lots of people click Simple Plastic Ruds for the skills and so these are often very cheap on auction since more of them are being made than can be used up for a given time period. So stay away from those as long as your bottom line is more important than the skills you get.
With experience you will eventually understand what the true cost to make these things actually is but as a general rule, the SR will tell you 2 things:
- the percent fails you get (95% SR means on average you will have 5 fails in 100 clicks)
- the long-term average TT returned (if you have an 80% SR BP, you will on average get 80% TT back, long-term, but short runs could be devastating)
I hope this helps.
Legends
If there's any other post you feel should be linked here because it contains a lot of very good information about crafting, please let me know.
Legends
Last edited: